Bond Inspection
Introduction
Adhesive bonding technology is playing an increasingly important role in a range of applications. Finding defective joints in aerospace components has been extensively investigated over a number of years [1-5], as the consequences of such a component failing are potentially catastrophic. The use of adhesive bonding in automotive components and structures is now commonplace, and these also have potentially serious safety implications in the event of failure.
Previous work [6-9] has identified that in certain situations there are distinct advantages in using electromagnetic acoustic transducers (EMATs) to examine bond integrity. The send-receive EMAT system used in these experiments has recently undergone significant improvements in the past couple of years. The electronic dead time of the system has been reduced to slightly over one microsecond, and in one embodiment the centre frequency of the ultrasonic system has been increased to approximately 16MHz. The experimental work has also been assisted by the advent of fast data acquisition cards and more powerful computation.
What sensors do we use and why do we use them?
The EMAT is a non-contact device that generates and detects ultrasound in electrically conducting or magnetic materials. On aluminium where the mechanism is electronic (Lorentz), the EMAT is a velocity sensor. Signal amplitude is a valid parameter over the frequency ranges used in these experiments since the detected electronic signal amplitude with frequency component ‘w’ is given by ‘Aw’, where ‘A’ is the ultrasonic wave amplitude of that component. The EMATs that we predominantly use in adhesive bond inspection are radially polarised shear wave EMATs. Shear waves are a more sensitive probe of interfacial condition than the conventional compression waves that are generated/detected by contact probes. As the EMATs are non-contact, no couplant is required making the inspection more rapid, more practical and less prone to measurement error. The operational efficiency of an EMAT system is dependent on the design of the EMAT and its supporting electronics, the proximity to the sample surface and the specific properties of the material being examined. The EMATs used in the experiments here are broadband devices with a centre frequency of approximately 5MHz.

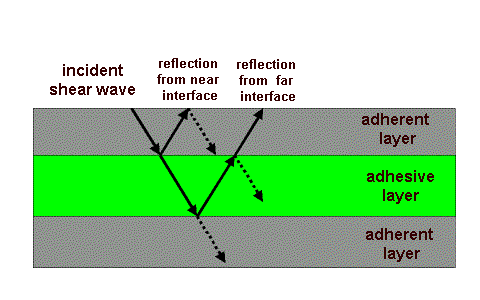
Figure 1
The above schematic diagram shows the basic ultrasonic features that we measure when attempting to test the structural integrity of the simplest type of adhesive bond (a lap joint). Note the nomenclature we have chosen to use of 'near' and 'far' interface which we will refer to later.
What type of defects can we detect?
The adhesive bonds we have examined were constructed from aerospace grade aluminium plate (one adherent 3mm thick, the other 5mm thick), and were bonded with the aerospace adhesive Redux 312. The particular sample that is presented here contained a smear of silicone grease on one adherent-adhesive interface.
A void defect is readily detectable with most ultrasonic inspection techniques [1]. A more difficult problem can arise where there is a kissing bond or a void that contains water. In either of these cases a compression wave would be able to propagate across the defective interface. One advantage of using an EMAT in such measurements is that there is a total reflection at an adherent-fluid interface (as shear waves do not propagate through a liquid), and also at a kissing bond interface which is not under compression. In the case of kissing bonds, shear waves can propagate across an interface under compression as the high contact pressure can force the two surfaces into intimate contact and give the interface shear rigidity. Where this occurs the shear wave will have a higher reflection coefficient than a longitudinal wave of equal frequency [1].
The defect presented here is one of the more difficult types to detect - this is mainly because the defect is on the 'far' interface and it is a thin layer of grease.
Some C-scan results

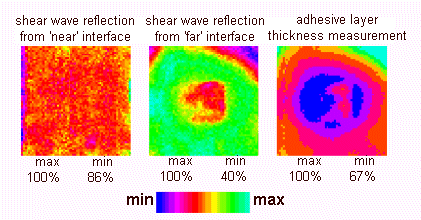
Figure 2
The above C-scans are taken on a silicone grease contaminated sample - it is located on the far adherent-adhesive interface. The amplitudes in each scan are normalised so that the maximum amplitude recorded in a scan is set as 100%.
Looking at fig.2 the near interface shows little sign of the defect. There is a slightly low area on the left of the scan due to the EMAT being just over the plate edge. Now the C-scan from the far interface is a totally different matter. There is clearly a feature in the central area of the bond but there is also something going on in the top corners - especially the right corner - what is it?
If we look at the 'thickness' measurement of the adhesive (from shear wave reverberations within the adhesive layer) we can see a potential problem. - Data that we capture from the far interface has travelled through the adhesive - it gets attenuated more strongly the thicker the adhesive layer is. So what we see in the far interface data is a combination of the effects of adhesive thickness (attenuation) and reflection coefficient variation (interface contaminants).
It is very difficult to manufacture very uniform thickness adhesive layer especially over large areas so it is something that we are going to have to be able to deal with. - Fortunately it looks as though we can - see below.
Simple deconvolution of adhesive thickness effects
It looks as though it may be possible to get some idea of what's going on at the far interface by calculating for the effects of attenuation. In this case we have used a simple model of exponential decay due to attenuation where attenuation coefficients were measured on a sample of the adhesive material. We are not suggesting that it will always be this straightforward particularly on highly wedged adhesive layers but it does look promising.

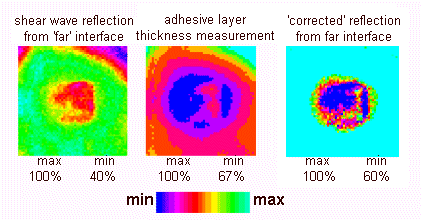
Figure 3
The above C-scans are taken on a silicone grease contaminated sample. We have used a simple assumption that the attenuation of the adhesive is exponential with thickness. Note that the modified C-scan of the far interface now only contains information about the far interface reflection coefficient (if our attenuation assumption is good enough).
The C-scan of fig.3 referred to as the 'corrected' far interface data is really the far interface C-scan modified by a exponential factor in terms of the adhesive thickness. Notice that the features in the far interface data are not visible in the modified C-scan.
What's next?
The radially polarised shear wave EMAT clearly offers some big advantages when testing aluminium lap joint specimens. We are also looking at a range of other types of joints and bonds, where in many cases the material is not suitable for investigation with EMATs such as composite carbon fibre joints.
References for further reading
[1] Segal E and Rose J L, Nondestructive techniques for adhesive bond joints, in:Research Techniques in Nondestructive Testing, 4, ed. R S Sharpe, Academic Press London and New York, 1980, pp275-316
[2] Temple J A G, Inspection of adhesive joints : a review, AEA Technology (March 1992), AEA-intec-0828
[3] Adams R D and Cawley P, A review of defect types and non-destructive testing of adhesively bonded structures : a review, J. Adhesion, 20, 1986, pp129-159
[4] Challis R E, Freemantle R J and White J D H and Wilkinson G, Ultrasonic compression wave NDT of adhered metal lap joints of uncertain dimensions, Insight, 37, pp954-962
[5] Tattersall H G, The ultrasonic pulse echo technique as applied to adhesion testing, J. Phys. D: Appl. Phys., vol.6, no.7, 1973, pp819-832
[6] He F , Rokhlin S I and Adler L, Application of SH and Lamb wave EMATs for evaluating adhesive joints, Rev. of Prog. In QNDE, ed. Thompson D C and Chimenti D E, 1987, pp911-918
[7] Rokhlin S I, Hefets M and Rosen M, An ultrasonic interface wave method for predicting the strength of adhesive bonds, J. Appl. Phys., 52, 1981, pp2847-2851
[8] Pilarski A and Rose J L, A transverse wave ultrasonic technique for interfacial weakness detection in adhesive bonds, J. Appl. Phys., 63, pp300-307
[9]. Dixon S, Edwards C and Palmer S B, The analysis of adhesive bonds using electromagnetic acoustic transducers, Ultrasonics, 32, 1994, pp425-430
