Weld Inspection
Introduction
There is always a need to inspect manufactured components for defects or degradation at various stages such as during production, post-production and in-service. Non-destructive testing (NDT) is undertaken for reasons of safety, risk management and critical path management and is usually performed within the stages of post-production and in-service. To highlight this point it is useful to consider welded steel plates, which are typically inspected using several techniques of which ultrasonic inspection is probably the most important. However, conventional ultrasonic testing still has some serious shortfalls, the most significant being the time it takes to inspect samples and the associated sample preparation cost of grinding the weld caps.
What can our novel non-contact approach to weld inspection offer?
- Increased inspection speeds.
- Increased reliability.
- Sensitivity to defects in any orientation.
- High temperature operation.
So what are the current and emerging ultrasonic inspection techniques for welded joint inspection?
Ultrasonic testing of welds is typically performed using contacting send-receive shear wave transducers [1,2] and now more commonly time-of-flight-diffraction (TOFD) systems [3-5]. The former can take considerable time and is subject to operator error. The TOFD inspection methods are relatively rapid, but are only sensitive to longitudinal defects and defects below the weld cap. As the TOFD technique is a contact method it is prone to errors introduced by variations in mechanical coupling or a total loss of coupling. Also contacting TOFD inspections can only be used close to room temperatures. While TOFD inspection can be a more powerful technique than conventional tests it will almost certainly be limited to ambient temperature manual testing.
General principle of our weld inspection technique
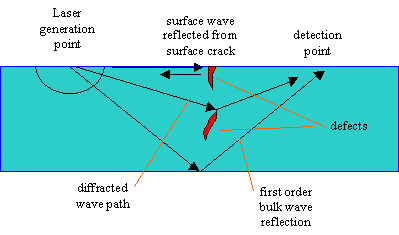
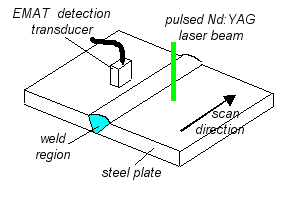
We have developed an experimental technique [5] that uses laser generated ultrasound to interrogate a welded steel specimen. The pulsed laser generates a number of different ultrasonic modes over the entire range of angles subtended at the sample surface, such that on a flat surface the wavefront is hemispherical into the sample (see figure 1). A line-like detector displaced from the point of generation is used to detect ultrasonic signals that have passed through the joined region. This is shown schematically in figure2. The complex nature of laser generated waveforms has been one of the most important factors that have held back its use in non-destructive testing. In our new technique this complex nature and the information it contains are used to advantage – the key to obtaining value from the data is the format in which it is presented.
The data generated from this technique is as with simple TOFD a qualitative technique, where the data is best examined by visual inspection in the first instance. The most important feature of any non-destructive testing technique is to primarily determine that a defect is present. It will not always be possible to extract exact qualitative data but this is more than compensated for in terms of test speed, reliability, operation at high temperature and sensitivity to all defect types in any orientation. Even if used just as complimentary pre-screening technique the potential benefits and savings are huge.
What are happens if a defect is present?
We can break the potential effect of a defect down into 2 different possibilities - consider the diagram below.
- A scattered or diffracted signal is detected.
- A signal that we we normally observe is 'blocked' to some degree.

Figure 1
The schematic diagram above shows how the laser-EMAT system can been used to identify defects by both the ‘blocking’ of expected ultrasonic signals and the diffraction of ultrasonic modes giving rise to ‘unexpected’ signals (as in the case of time of flight diffraction using contact probes).
Experimental set-up
Our work to date [6] has used point-like and line laser generation sources (figure 2.) With a point source the various ultrasonic modes propagate in all directions and hence are sensitive to defects in all orientations and also to defects that do not lie directly between source and detector. In some cases it is desirable to concentrate detection on one type of defect such as a longitudinal defect that could be a root defect, planar defect or a surface crack. In these cases an improved approach would be to use a laser line source positioned parallel to the defect. There would of course be some sacrifice in terms of a loss of sensitivity to transverse defects, but the approach yields a higher signal to noise ratio than the point generation source.

Figure 3
The schematic diagram (left) shows one particular configuration of the laser-EMAT system operating on welded steel plates The laser beam impact point and EMAT detector are scanned together along the plate. Additional transducers can also be used to detect back-reflected signals.
How should we examine the data?
As mentioned earlier, the waveforms (or A-scans) that are generated are much more complicated than those obtained in conventional ultrasonic testing. This is because the waveform contains more information and the key to unlocking this data is to present it in a form that firstly we can interpret.
To illustrate the how complicated the waveform can be look at the A-scan below in figure 4 - note however that we can predict and determine all the signals we should detect on an ideal weld due to the simple geometry. It is expecting too much for an operator (or anyone else) to determine the presence of a defect by looking at this type of waveform.

Figure 4
The ultrasonic waveform (A-scan) illustrates the complicated multi-mode nature of laser generated ultrasound. The bulk wave modes are shown as S for a shear wave and L for a longitudinal wave, such that SS represents a shear wave reflection from the back surface. The signal marked LS is a mode converted signal that consists of a shear wave that has mode converted to a longitudinal wave on reflection or a longitudinal wave that has mode converted to a shear wave on reflection. R is the Rayleigh wave and L the surface skimming longitudinal wave.
B-scan to the rescue!
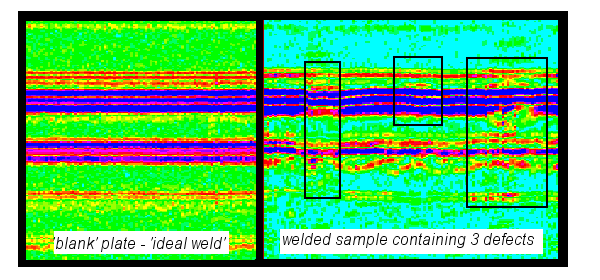
Fortunately there is a way that we can present the data in which defects can easily be identified - the B-scan. What happens is that the A-scan of figure 4 has its amplitude digitised into a colour spectrum, usually after we have rectified the signal. This is repeated for every waveform that we detect as we scan along the line of the weld and we stack these waveforms side-by side to create a B-scan. So, referring to the B-scans below, the horizontal axis represents the position along the weld, the vertical axis is actually a time axis and the colour represents the amplitude of the A-scan at that point in the waveform.

Figure 5
The two B-scans above show a ‘blank’ 20mm thick steel plate (representative of an ideal weld, and a scan obtained on a welded sample containing 3 defects, taken using a hybrid laser-EMAT system. Ultrasonic signals arising as a result of these defects are indicated within the dashed boxes.
What are we looking for?
From theory (and experimental confirmation) we know what an ideal weld should look like in a B-scan representation (see above). So what we do is look for disruptions in a pattern of the B-scan that indicate the presence of a defect as shown above in the 3 areas indicated in figure 5. In many cases we can accurately determine the size of a defect within the weld (such as root or surface crack defects) but not in all cases (NOTE: we can always determine the location of the defect on the 'x-axis') . This is because there is a number of wave modes present in the waveform and it is not always possible to identify what wavemode is responsible for a disruption in the B-scan data - so in some cases we know its there, where it is, but not exactly what it is. For most cases it is enough to know that a defect is there and it can always be checked in detail later using time consuming contact inspection.
References for further reading
[1] Szilard J, Review of conventional testing techniques, in:Ultrasonic Testing, ed.J. Szilard, John Wiley & Sons, New York, 1982, pp25-52
[2] Halmshaw R, “Non-Destructive Testing”, Edward Anrnold, 1987
[3] Silk M G and Lidington B H, Defect sizing using an ultrasonic time delay approach, Brit. J. Non. Destr.Test., 17, 1975, pp33-36
[4] Carter P, Initial operational experience with the automated digital ultrasonic inspection system - ZIPSCAN , Brit. J. Non. Destr.Test., 27, 1984, pp286-290
[5] Kuo M K, Lin T R, Liu P L, Wu T T, Locating the crack tip of a surface-breaking crack - Part I. Line crack, Ultrasonics, 1998, vol.36, no.7, pp.803-811
[6] Dixon S, Edwards C and Palmer S B, A novel laser-EMAT system for ultrasonic weld inspection, Ultrasonics vol.37 1998, pp273-281
