
Social media share buttons
You can add buttons to a page that enables visitors to share your SiteBuilder page via Twitter, Facebook, LinkedIn or by email.
In this article:
Add social media share buttons to a Components Editor page
-
Browse to the page where you want to add social media share buttons.
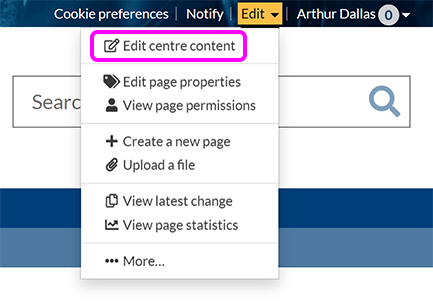
-
Go to Edit > Edit centre content:
-
Place your cursor where you want the buttons to appear.
-
Select Icons/buttons > Social media buttons:

-
The Add social media buttons pop-up appears:

-
Use the checkboxes to choose which social media platforms you want to allow visitors to directly share to.
-
Use the drop-down to Arrange the buttons either Horizontally or Vertically.
-
Select Add buttons.
-
When you're finished editing your page, select Publish.
Add social media share buttons in the old visual editor
-
Go to the page where you want to add the share buttons.
-
Go to Edit > Edit centre content or Edit right content.
-
In the toolbar, select Insert a > Social media button(s).
-
Use the checkboxes to specify which buttons to show.
-
Choose between a horizontal or vertical layout.
-
Select Insert.
-
Select Publish.
The [likethis] tag.
When you insert social media share buttons via the toolbar, the [likethis] tag is added your page. The following example displays all share buttons in a horizontal layout:
[likethis fb=true linkedin=true email=true tweet=true display=horizontal]
To show only Facebook and Twitter icons vertically, for example, use:
[likethis fb=true tweet=true display=vertical]